
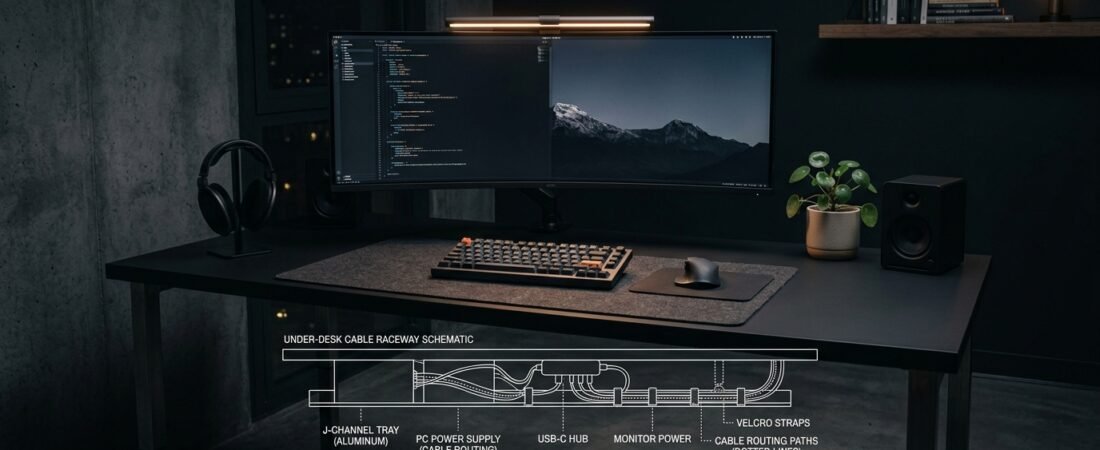
Following a practical minimalist desk setup guide is the fastest way to build an ergonomic home office without wasting budget on unnecessary accessories. When you spend long hours coding, writing, or designing, aesthetic minimalism cannot compensate for poor physical clearances, tangled power bricks, or reflective monitor glare.
True productivity comes from eliminating physical and cognitive friction. This comprehensive minimalist desk setup guide provides exact ergonomic clearances, 3-zone under-desk cable routing blueprints, zero-glare task lighting calibrations, and tactile peripheral choices aligned with the OSHA Computer Workstations Guidelines.
The 5 Non-Negotiables of a Functional Setup
- Ergonomic Clearance: Eye-Level Screen Alignment — Top third of your display must sit flush with eye height to eliminate cervical spine compression.
- Invisible Power Conduit: 3-Zone Cable Routing — Consolidate charging bricks into a heavy-duty under-desk raceway with a single grounded wall drop.
- Asymmetric Optical Plane: Screen Light Bar Calibration — Direct light at a 45-degree angle downward on your workspace, eliminating panel glare.
- Posture Alignment: Spinal & Armrest Support — Synchronize desk height with 90-degree elbow angles to prevent shoulder hunching.
- Tactile Control Surface: Compact Inputs & Felt Mats — 75% mechanical keyboards preserve shoulder width, while felt dampens typing resonance.
Blueprint Contents
- 1. Minimalist Desk Setup Guide: Dimensions & Clearance Matrix
- 2. The 3-Zone Under-Desk Cable Routing & Conduit Guide
- 3. Monitor Light Bar Positioning & The 45° Optical Rule
- 4. Ergonomic Seating: Sacral Stabilization & Desk Sync
- 5. The Tactile Layer: 75% Mechanical Keyboards, Mice & Felt Mats
- 6. Full Setup Impact Matrix & Specification Table
- Frequently Asked Questions
- Final Workspace Verdict
Minimalist Desk Setup Guide: Dimensions & Clearance Matrix
Setting up without measuring clearances is the primary cause of chronic upper-back burn and wrist fatigue. The human head weighs approximately 10 to 12 pounds in a neutral upright position. Tilting forward by just 15 degrees to view an unadjusted screen multiplies the gravitational load on your cervical spine to nearly 27 pounds.
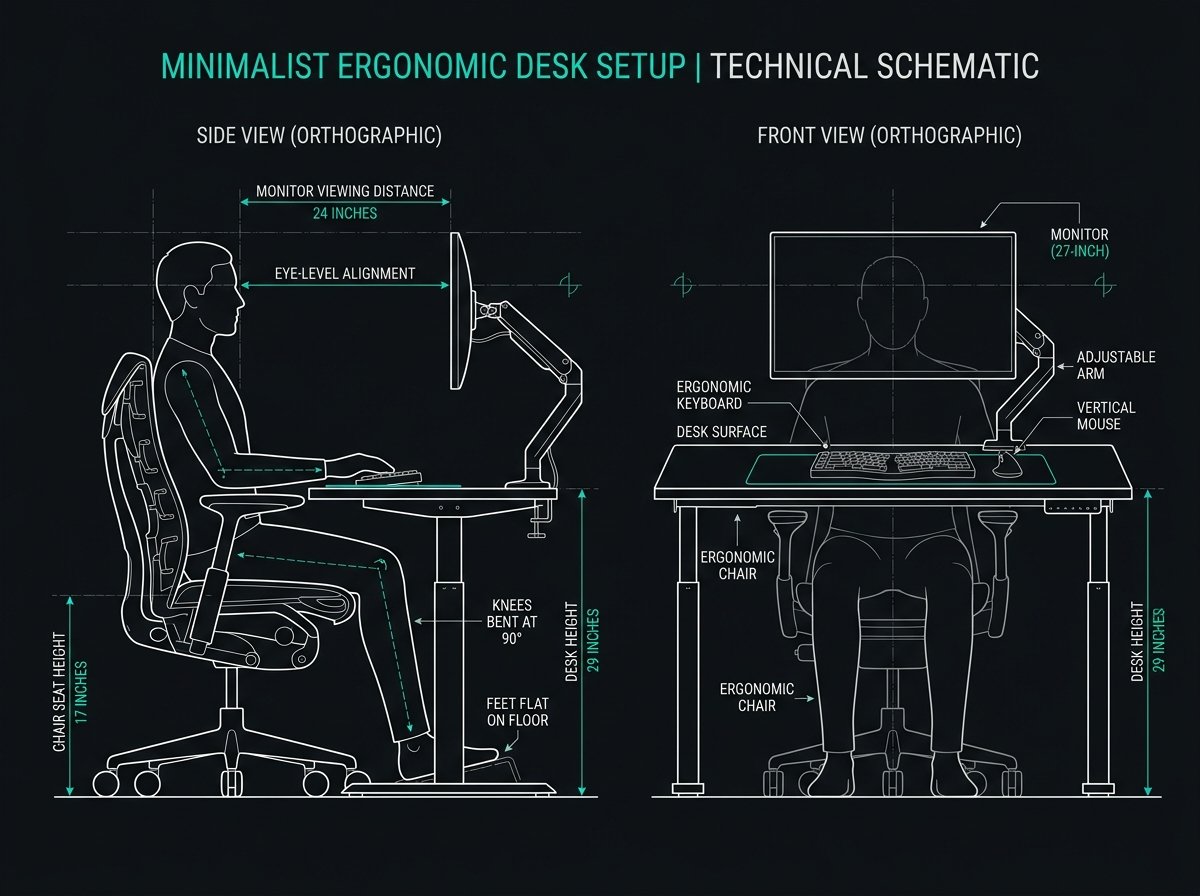
📐 How to Calculate Your Personal Desk Clearance:
- Seat Height First: Adjust your chair until your feet rest completely flat on the floor with no pressure on the back of your thighs. Your knees should form a clean 90-degree angle.
- Elbow-to-Desk Calibration: Relax your shoulders and drop your elbows to your sides. The height from the floor to the bottom of your bent elbow is your exact ideal desk surface height. If your fixed desk is taller than this measurement, raise your chair and use an ergonomic footrest.
- The Arm’s Length Rule: Sit fully back in your chair, extend your arm forward with your knuckles loose. Your fingertips should barely graze the screen glass. If your screen is closer than 20 inches, your eyes will constantly work to converge, causing end-of-day eye strain.
The 3-Zone Under-Desk Cable Routing & Conduit Guide
Nothing destroys a clean workspace faster than black power cords looping in mid-air or bulky transformer bricks sitting on the floor gathering dust. As detailed throughout this minimalist desk setup guide, the architectural standard is simple: only one power cable should ever touch the floor. Everything else must be mapped and suspended beneath the tabletop.
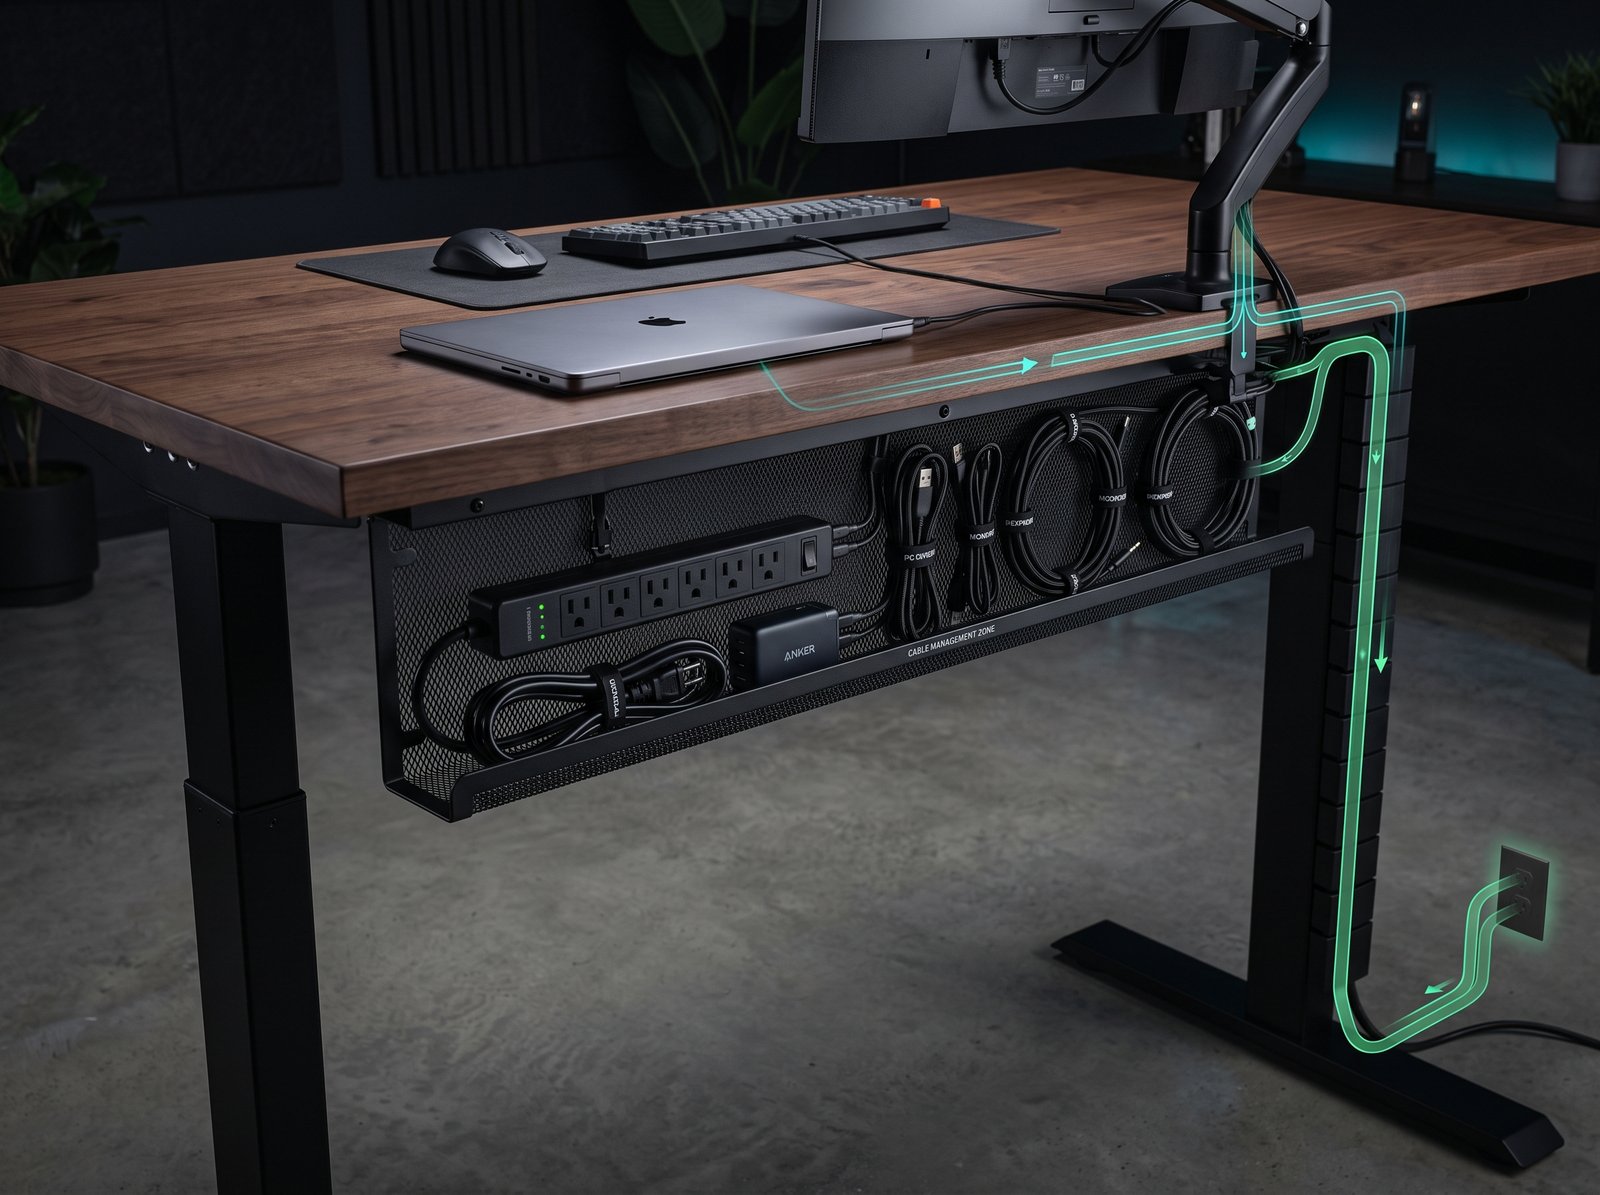
⚡ The 3-Zone Execution Workflow:
- Zone 1 — Peripheral & Display Tracing: Route your DisplayPort/HDMI, monitor power, and light bar USB cables directly through the internal tracks of your monitor arm. Leave exactly 2 inches of slack at the articulation joints so the arm can rotate without pulling the ports. No cords should ever hang straight down from the screen bezel.
- Zone 2 — The Under-Desk Power Central (The Raceway): Mount a heavy-duty, clamp-on metal cable tray directly below your monitor mount. Place a 6-to-8 outlet surge protector inside. Plug all bulky laptop bricks, monitor transformers, and GaN multi-chargers directly into this tray. Use reusable hook-and-loop velcro straps to coil up excess cord lengths.
- Zone 3 — The Single Ground Drop: From your under-desk tray, run only the master power strip cord down the rear desk leg. Conceal it inside a magnetic spine or fabric zipper sleeve that hugs the inner leg profile straight into the wall receptacle.
Want a full visual breakdown of clamp trays, magnetic desk spines, and cord sleeves? Explore our tested roundup of the Best Cable Management Solutions for Modern Desks[cite: 1].
Monitor Light Bar Positioning & The 45° Optical Rule
Overhead room bulbs create harsh shadows directly where your hands type, while traditional swing-arm lamps bounce reflections off the glass surface of your display. A monitor light bar solves both issues when calibrated correctly.
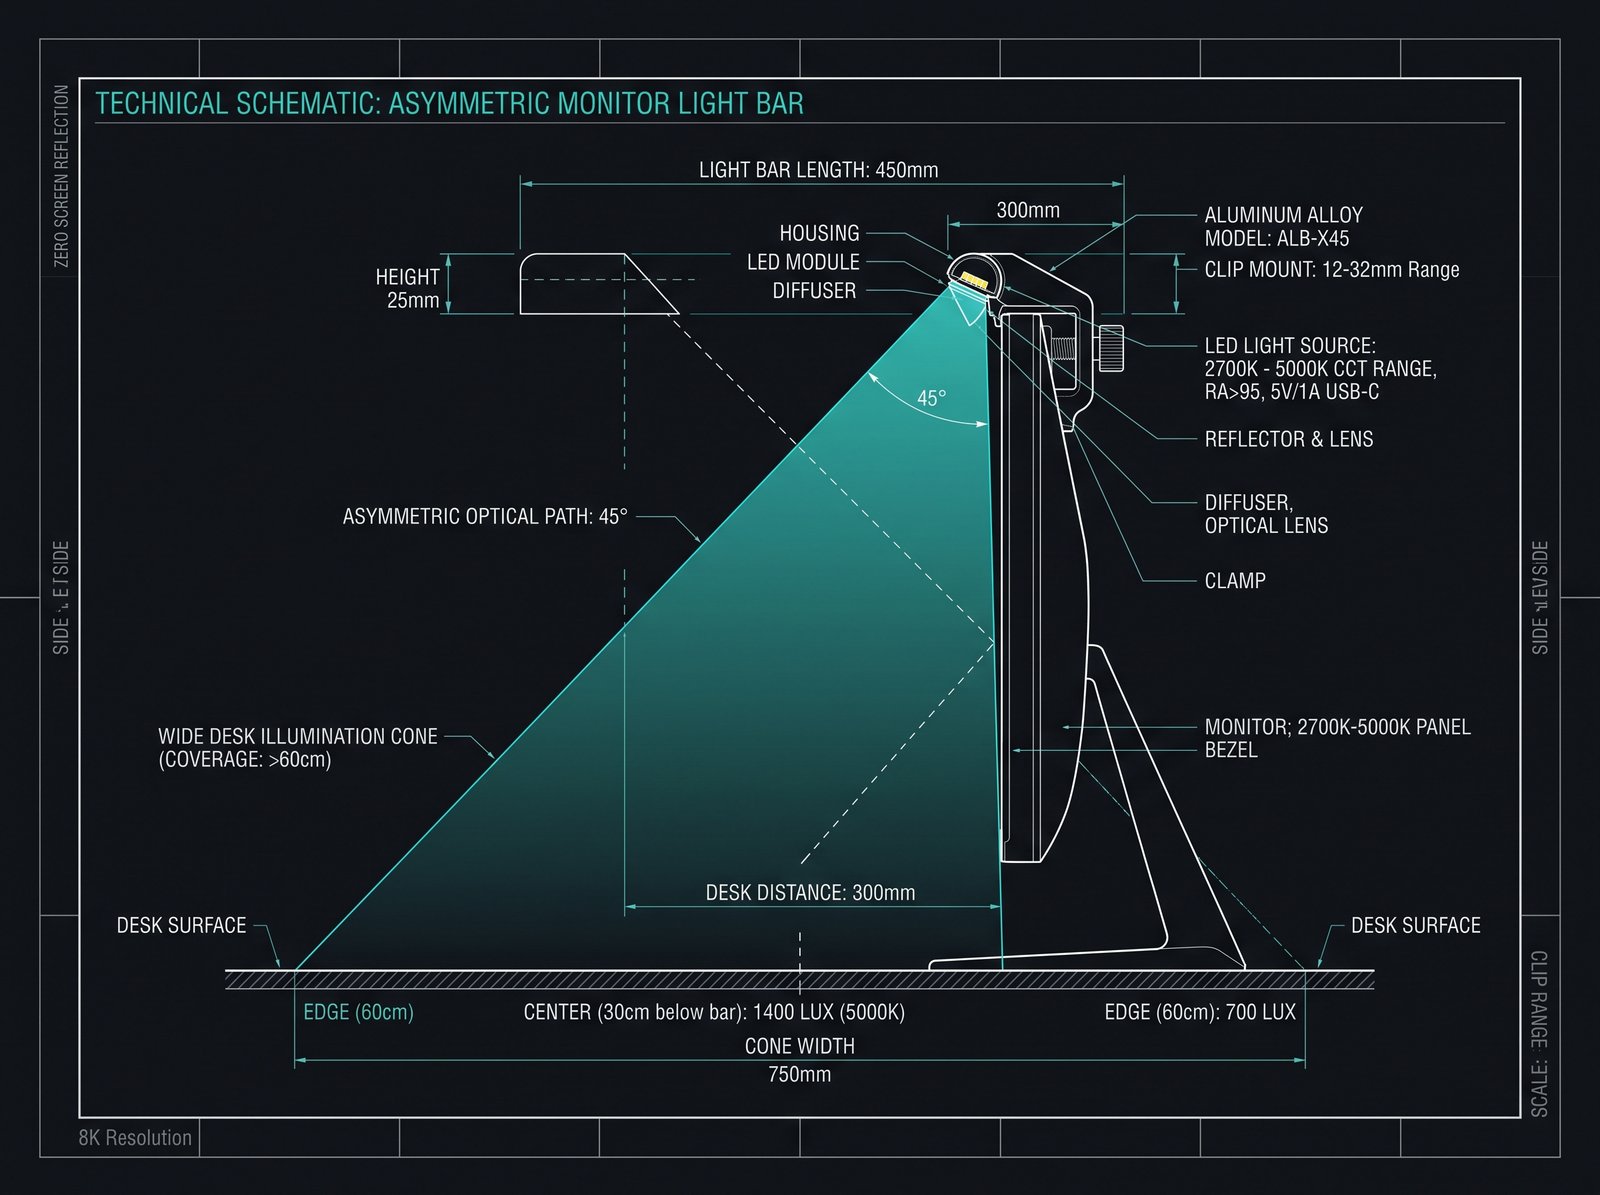
💡 How to Calibrate Your Light Bar Correctly:
- The Zero-Glare Angle: Adjust the cylindrical bar in its counterweight cradle until the sharp cutoff line of the beam lands directly along the bottom bezel of your monitor. The light cone should illuminate your desk pad and keyboard, but zero light rays should wash out the pixels on your screen.
- Color Temperature Management: Use cool white light (4500K+) during peak focus hours in the morning and early afternoon to suppress melatonin and maintain alertness. Shift down to warm tungsten (below 3000K) as soon as the sun sets to reduce eye fatigue and promote healthy sleep cycles.
- Desktop Clutter Elimination: By mounting the light source directly onto your monitor’s top frame, you reclaim an entire square foot of prime desk space previously taken by lamp bases.
Comparing touch-bar controls versus wireless desktop puck dials? Read our comprehensive comparison of the Best Monitor Light Bars for Desk Setups.
Ergonomic Seating: Sacral Stabilization & Desk Sync
Flawless cable mapping and perfect lighting cannot compensate for a chair that collapses your pelvis into posterior tilt. An essential takeaway from any ergonomic minimalist desk setup guide is that most standard office chairs have overly soft foam cushions that allow your tailbone to sink while leaving the base of your spine unsupported.
🪑 The 3 Principles of Workday Seating Ergonomics:
- Sacral vs. Lumbar Support: The human lumbar curve is anchored by your sacrum (the base of the pelvis). Quality chairs use dynamic sacral mechanisms that push gently against the pelvic ridge, keeping your spine naturally S-curved without aggressive lumps poking into your lower back.
- Seat Pan Depth Clearance: When sitting fully back against the backrest, maintain a 2-to-3 finger gap between the front edge of the seat cushion and the back of your knees to prevent arterial compression.
- Armrest Synchronization: Your armrests should sit exactly level with your tabletop so elbows rest comfortably at 90 degrees while typing, preventing shoulder hunching.
Suffering from thoracic tightness or tailbone pressure? Read our in-depth analysis of the Best Ergonomic Office Chairs for Back Pain to find a chair tailored to your exact height and build.
The Tactile Layer: 75% Mechanical Keyboards, Mice & Felt Mats
Your desk surface is your active cockpit. Every keystroke, mouse click, and wrist rest impacts your joint health and focus. Setting up input gear is an intentional geometry problem:
⌨️ Peripheral Selection & Placement Logic:
- Why 75% Mechanical Boards Reign Supreme: Full-size 104-key keyboards force your mouse arm 6 to 8 inches too far to the right due to the integrated number pad. This forces continuous shoulder rotation. A 75% compact keyboard preserves essential arrow keys and function rows while keeping your mouse centered within your natural shoulder width.
- Ergonomic Contour Mousing: Standard flat office mice force your forearm bones to twist unnaturally into pronation. An ergonomic mouse with a contoured thumb shelf and angled grip supports a relaxed handshake angle, dramatically reducing carpal tunnel tension.
- Wool Felt vs. PU Leather Desk Pads: A large desk mat provides a smooth, low-friction tracking surface for your mouse while absorbing acoustic resonance from mechanical keyboard switches.
Exploring quiet linear switches, wireless Bluetooth pairing, and hot-swap boards? Read our researched guide to the Best Minimalist Mechanical Keyboards for Productivity.
|
Minimalist Setup Hardware Matrix & Ergonomic Impact
Scroll right →
|
||||
|---|---|---|---|---|
| PRODUCT | HARDWARE TYPE | KEY BENEFIT | SETUP IMPACT | AMAZON |
| Under-Desk Cable Tray | Cable Management Raceway | Hides power strips & adapters off the floor | Essential | View Deal ↗ |
| Monitor Light Bar | Asymmetric Screen Bar | Directs light forward with zero glare | High | View Deal ↗ |
| Compact Mechanical Keyboard | 75% Minimalist Mechanical Board | Compact footprint frees up wide mouse space | High | View Deal ↗ |
| Ergonomic Mouse | Precision Wireless Pointer | Reduces wrist strain with silent clicks | High | View Deal ↗ |
| Wool Felt / Leather Desk Pad | Minimalist Acoustic Desk Mat | Dampens keyboard acoustics & protects desk | Medium | View Deal ↗ |
| Reusable Cable Ties | Hook-and-Loop Cable Straps | Keeps cables neatly bundled inside tray | Essential | View Deal ↗ |
Frequently Asked Questions
What is the primary objective of this minimalist desk setup guide?
To eliminate physical fatigue and visual distractions. Elevating your monitor to eye level prevents neck strain, while mounting an under-desk cable tray instantly removes 80% of visible room clutter.
Why do you recommend reusable velcro ties over standard zip ties?
Plastic zip ties pinch copper wiring inside sensitive DisplayPort or Thunderbolt cables. Reusable hook-and-loop velcro straps can be adjusted indefinitely without damaging insulation.
Will a monitor light bar work on a curved ultrawide monitor?
Yes, provided the light bar clamp is designed with an adjustable pivot cradle. Certain specialized models feature curved aluminum housings engineered specifically for curved displays.
The Minimalist Workspace Verdict
A truly practical minimalist desk setup guide is not about having a completely empty table—it is about creating an intentional ecosystem. Mount your power bricks into an under-desk cable tray, elevate your display to eye level, and illuminate your desk with zero glare.
Start with the Under-Desk Cable Tray on Amazon ↗